If you are a dog owner with a backyard, you likely know the struggle of yellow grass, muddy paw prints, and constantly watching your step. When your dog uses the entire yard as their personal bathroom, your landscaping suffers, and backyard cleanups become a massive chore. The solution is creating a designated outdoor dog potty area.
By training your dog to use one specific spot, you save your lawn from nitrogen burn, make waste removal incredibly easy, and keep the rest of your yard clean for kids, guests, and gardening. Whether you have a sprawling backyard, a small side yard, or just an apartment balcony, there is a dog potty solution for you.
This guide breaks down everything you need to know about building or buying an outdoor dog potty area. We will cover the best materials, detailed DIY projects, convenient store-bought options, and how to maintain the space so it stays odor-free.
Important Things to Consider Before You Build
Before you start digging up your yard or ordering products online, you need to plan the space. Here are the key factors to consider for a successful dog potty area.
Location and Accessibility
Your dog needs to be able to reach the potty area easily, especially during bad weather or late at night. Do not put it at the very back of a massive yard, or your dog might just stop halfway there. However, you also do not want it right next to your outdoor dining table. The ideal spot is an unused side yard or a quiet corner that is easily accessible from the back door.
Size of the Area
The size of your dog and the size of your yard dictate the dimensions of the potty space. A small breed like a Chihuahua or a Pomeranian might only need a 3-foot by 3-foot space. A large breed, like a German Shepherd or a Great Dane, will need much more room to circle and sniff before doing their business. A good rule of thumb is to make the area at least 4 feet by 6 feet for a medium to large dog.
Drainage
Drainage is the most critical part of an outdoor dog potty area. Urine needs somewhere to go, or the area will quickly become a swamp of foul odors. If you are building a DIY area on dirt, you must excavate a few inches and add a base layer of crushed rock to ensure liquids drain deep into the soil. If you are using a store-bought tray on a patio, you need to consider how you will empty the liquid or route a drainage hose to a safe runoff spot.
Sun and Shade
Direct sunlight acts as a natural disinfectant and helps dry out urine quickly. However, materials like artificial turf and certain stones can become burning hot in the afternoon sun. Try to find a spot that gets morning sun and afternoon shade, or be prepared to hose down the area to cool it off on hot summer days.
11 Best Outdoor Dog Potty Area Ideas
Here is a breakdown of the best DIY materials and store-bought systems you can use to create the perfect dog bathroom.
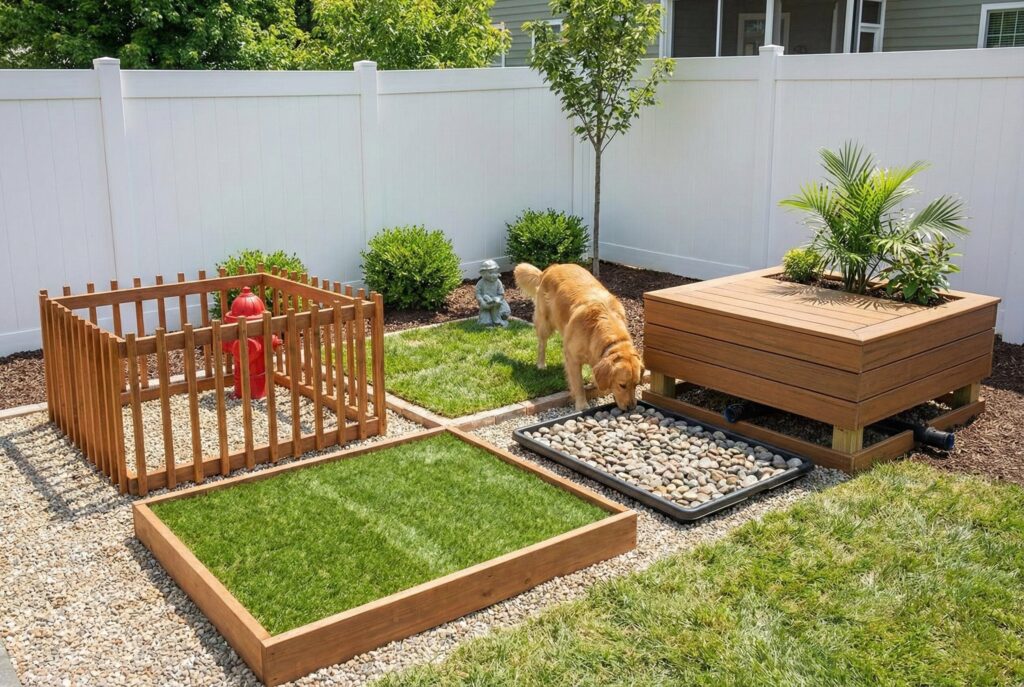
1. The Pea Gravel Pit (DIY)
Pea gravel is one of the most popular choices for a DIY dog potty area. The small, smooth stones are gentle on dog paws, unlike sharp crushed rock. The gaps between the stones allow for rapid drainage, meaning urine washes away quickly into the soil below.
To build a pea gravel dog potty, you need to dig out about three to four inches of topsoil. Lay down a heavy-duty weed barrier landscape fabric to prevent weeds from growing up through the stones and to keep the stones from sinking into the mud. Create a border using landscaping timbers, bricks, or heavy plastic edging to keep the loose gravel contained. Finally, fill the area with a thick layer of pea gravel.
Pros:
- Excellent drainage for urine.
- Solid waste sits on top and is very easy to scoop.
- Relatively inexpensive to buy gravel in bulk.
- Looks natural and blends well with yard landscaping.
Cons:
- Dogs who love to kick up dirt after going to the bathroom might scatter the gravel outside the border.
- The stones can get hot in direct, intense sunlight.
2. Artificial Turf Patch (DIY or Store Bought)
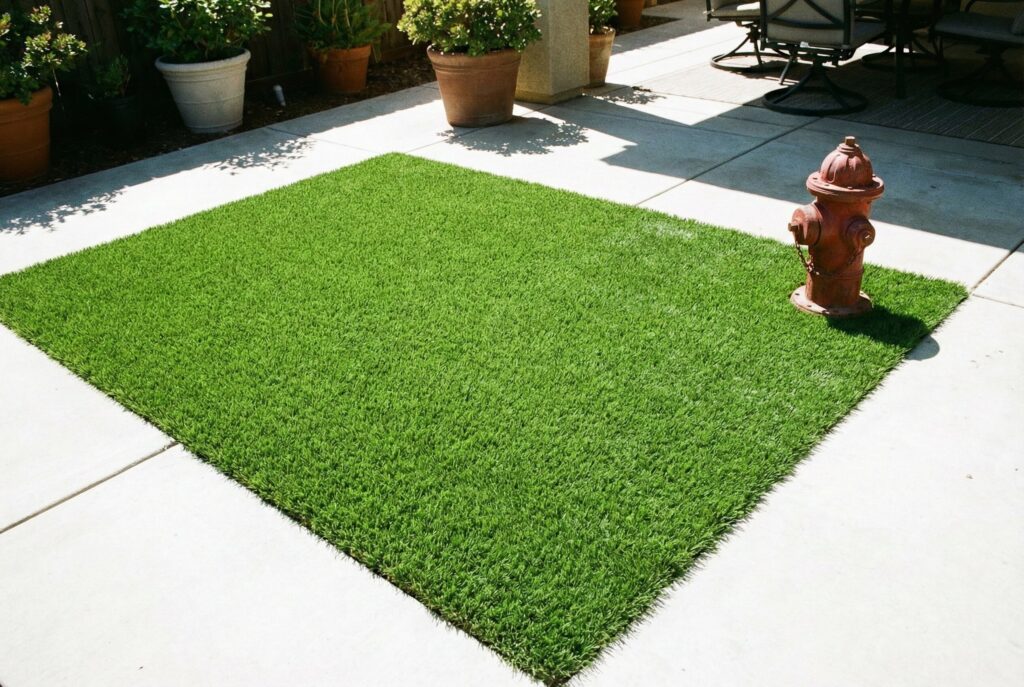
Many dogs prefer the feel of grass under their paws. Artificial turf gives your dog the sensory experience of real grass without the dead yellow spots. When choosing artificial grass, you must select a product specifically designed for dogs. Pet turf has a highly porous backing that allows liquids to drain through rapidly, and the blades are usually shorter and easier to clean.
For a DIY yard installation, dig out the area, lay down a base of crushed drain rock, level it with a layer of sand, and then stake the artificial turf tightly on top. For patios or decks, you can buy pre-made turf trays that elevate the grass above a collection pan.
Pros:
- Looks beautiful and stays green all year round.
- Familiar texture for dogs who are used to peeing on lawns.
- Soft and comfortable for the dog.
Cons:
- Requires frequent rinsing with a hose and enzymatic cleaners to prevent trapped odors.
- Can become extremely hot in direct sunlight; may burn paws if not shaded.
3. Cedar Mulch Area (DIY)
Wood chips or mulch provide a highly absorbent and natural-looking potty area. Cedar mulch is particularly excellent because it has natural odor-absorbing properties and a pleasant scent that masks the smell of dog urine. It also naturally repels certain insects like fleas and ticks.
Setting up a mulch area is incredibly simple. You outline your space, lay down a weed barrier, and pour a thick layer (about three inches) of cedar mulch.
Important Note: Never use cocoa bean mulch, as it is highly toxic to dogs if ingested. Stick to cedar or standard pine.
Pros:
- Very budget-friendly and easy to transport.
- Natural cedar scent fights bad odors.
- Easy to rake out and replace every few months.
Cons:
- Solid waste can be slightly messy to pick up, as the mulch clings to it.
- Lightweight wood chips can blow around in heavy winds or wash away in heavy rain.
4. The Sand Sandbox (DIY)
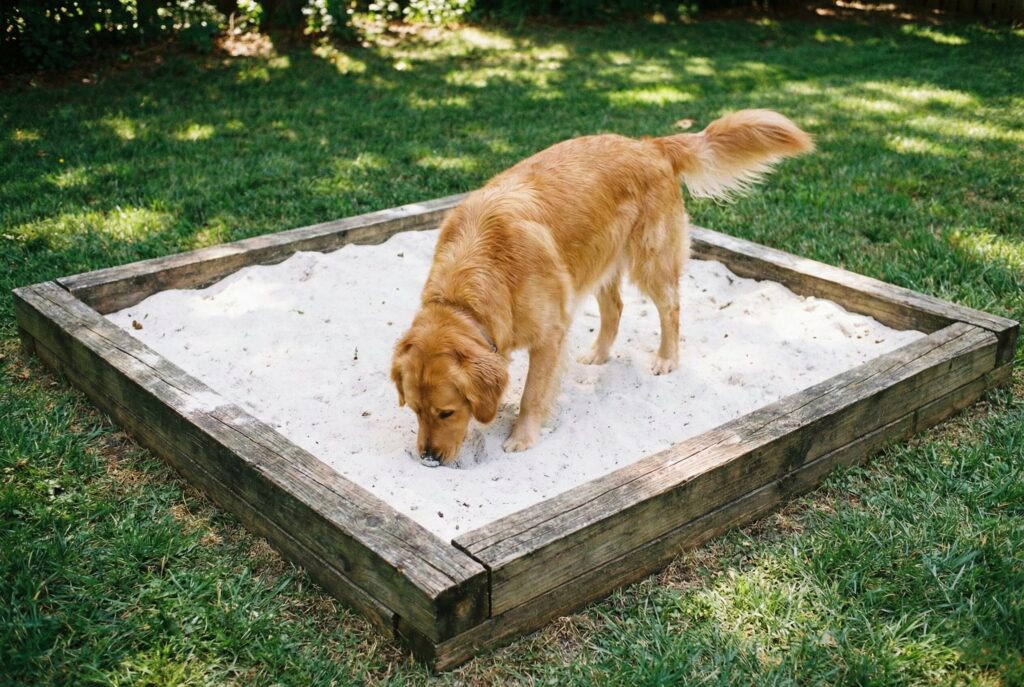
Sand is an excellent material if your primary goal is easy cleanup. Think of it like a giant litter box for your dog. Urine clumps slightly or drains through, and solid waste sits right on top, making it incredibly easy to scoop with a standard dog poop scooper or a heavy-duty litter scoop.
To create this, you will build a shallow box out of treated lumber, lay down a weed barrier, and fill it with coarse builder’s sand or play sand.
Pros:
- The easiest material for picking up solid waste.
- Very comfortable and soft on dog paws.
- Inexpensive to fill and top off.
Cons:
- Sand sticks to wet paws and will get tracked into your house.
- It can become a digging temptation for dogs who love to dig.
- Cats in the neighborhood might mistake it for their own giant litter box.
5. Real Grass Patch Delivery Service (Store Bought)
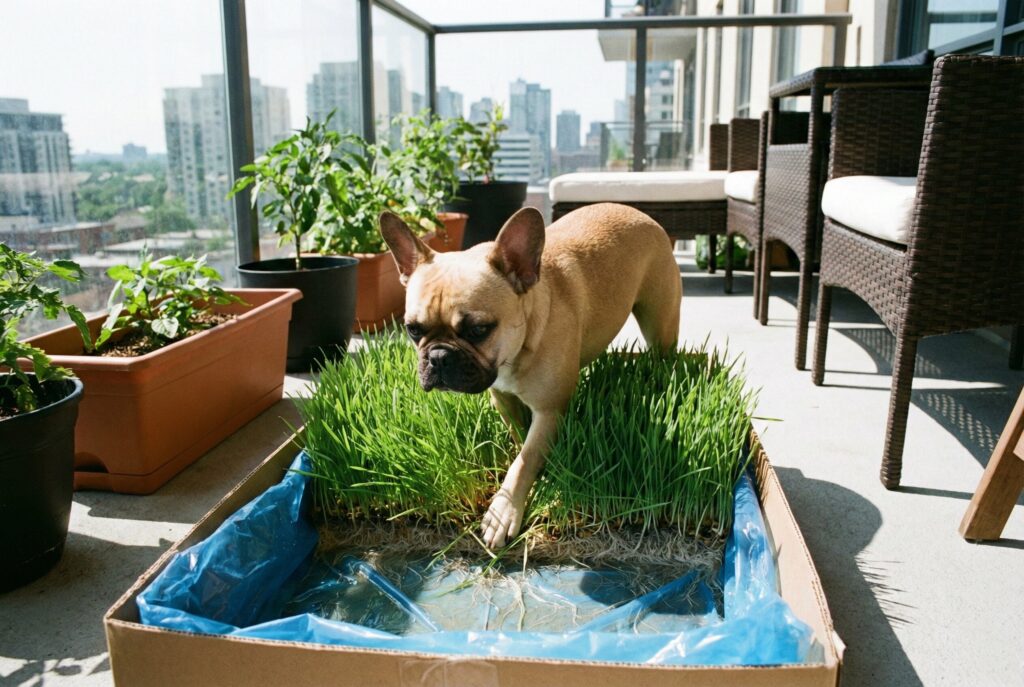
If you live in an apartment, have a concrete patio, or just do not want to do any heavy lifting, a real grass delivery service is a brilliant solution. Companies ship you a box containing a patch of real, living grass grown hydroponically or on a soil-less mat.
The grass naturally absorbs urine and neutralizes odors thanks to the complex root system. Because it is real grass, dogs are instinctively drawn to it, making potty training incredibly fast. Once the grass begins to die or smell (usually after two to four weeks, depending on dog size), you simply throw it in the compost or trash and replace it with a fresh patch from your subscription.
Pros:
- Zero maintenance other than picking up solid waste.
- Instinctive for dogs to use; it requires almost no training.
- Perfect for balconies, decks, and indoor use.
Cons:
- It is an ongoing monthly expense.
- Not ideal or cost-effective for giant breeds that produce a lot of waste.
6. Concrete Pad with Wash-Down System (DIY/Pro)
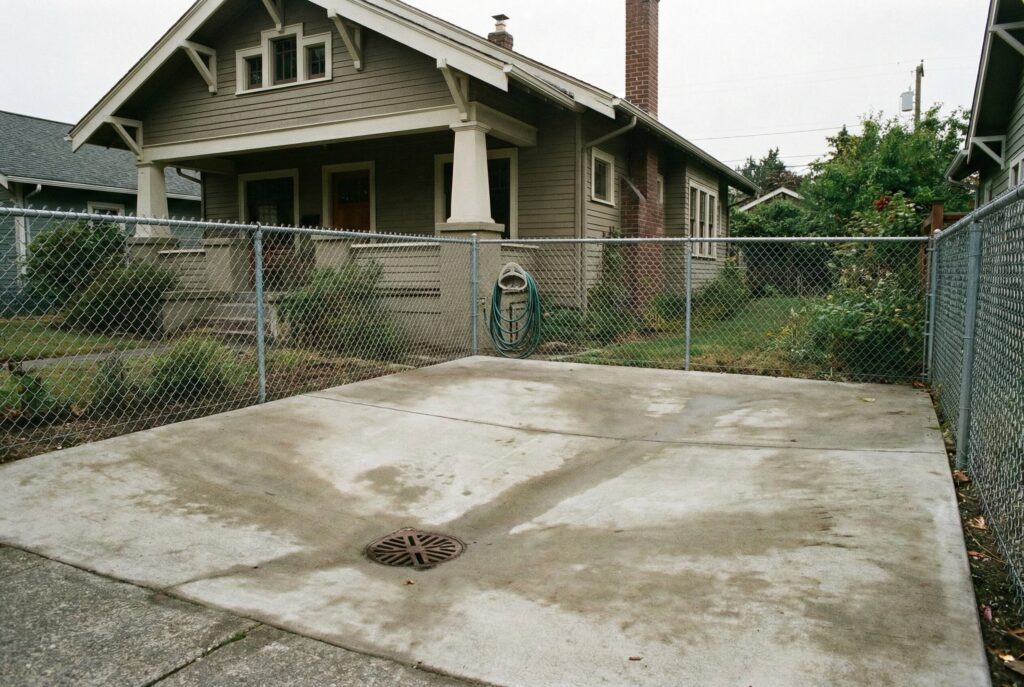
For multiple dogs or very large breeds, a concrete dog run is the ultimate heavy-duty solution. Concrete does not get torn up by pacing paws, and it will never become a muddy mess.
The secret to a successful concrete potty area is the slope and seal. The concrete must be poured with a slight grade so that all liquids run down into a designated drain or a gravel trench. Additionally, the concrete must be sealed with a pet-safe, waterproof masonry sealer so the porous concrete does not absorb the urine odors over time.
Pros:
- Incredibly durable; will last a lifetime.
- Highly sanitary if hosed down daily.
- Easy to clean solid waste.
Cons:
- Expensive and labor-intensive to install.
- Not as comfortable for dogs as grass or mulch.
- If not sealed properly, concrete traps urine smells permanently.
7. Porch Potty with Drainage Hose (Store Bought)
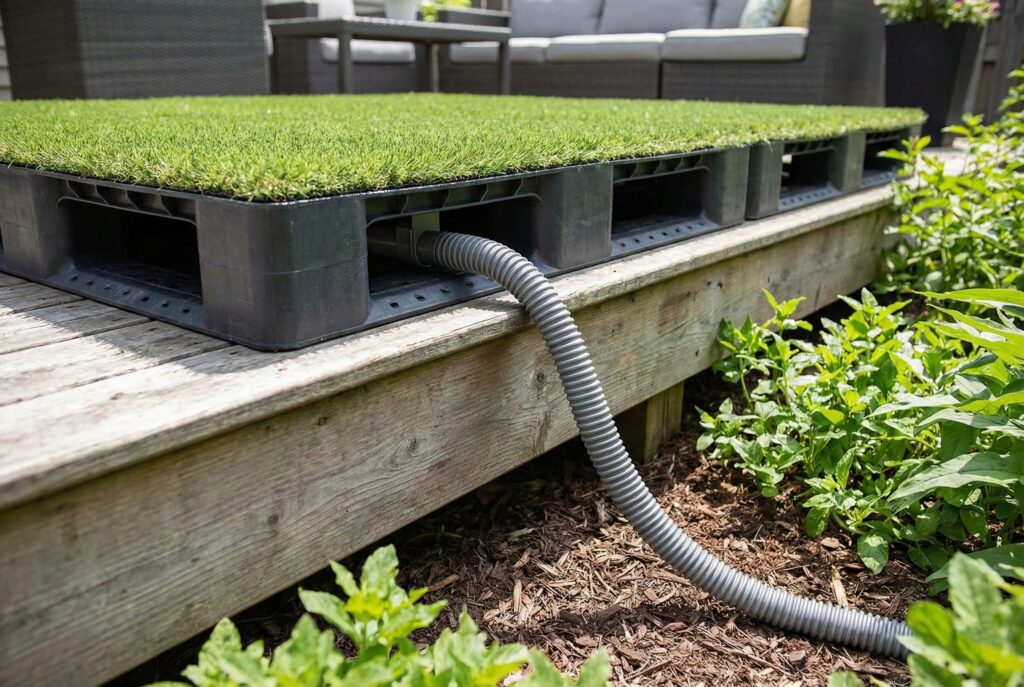
A Porch Potty is a specific type of high-end, store-bought dog bathroom designed for decks and patios. It features a raised platform covered in synthetic grass. Below the grass is a grooved tray that catches urine and directs it toward a drain hole.
The best feature of these premium systems is the drainage hose. You can attach a flexible hose to the bottom of the tray and route it off your balcony or into a nearby rain gutter or garden bed. Some models even come with a built-in sprinkler system; you just attach your garden hose, turn it on for a minute, and water washes the entire turf pad clean.
Pros:
- Excellent for keeping patios and balconies completely clean.
- The drainage hose eliminates the need to empty a pan of stale urine.
- Very hygienic design.
Cons:
- High initial purchase price.
- You need a safe place to route the drainage hose.
8. Paving Stone Bordered Dirt Area (DIY)
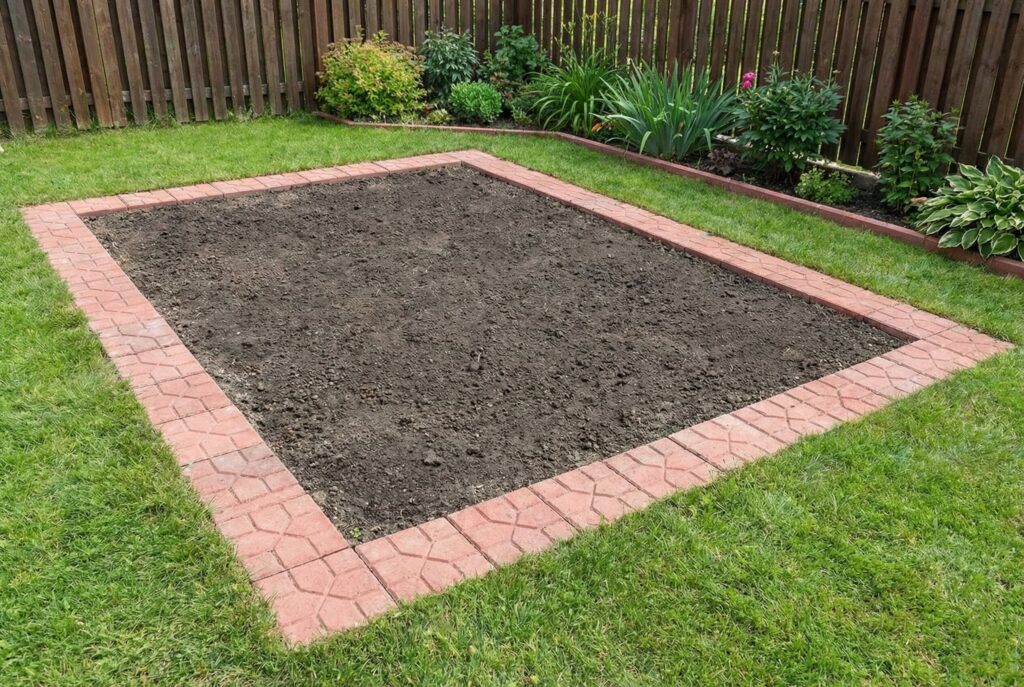
Sometimes, the simplest solution is the best. If you have a corner of your yard where grass refuses to grow anyway, you can formalize it into a dog potty area. Simply remove any remaining weeds or grass, level the dirt, and create a solid visual boundary using heavy paving stones or bricks.
The paving stones serve two purposes: they keep the surrounding lawn from creeping into the dirt patch, and they provide a clear visual marker for your dog. When you train your dog, you teach them to cross over the stones before they are allowed to go to the bathroom.
Pros:
- Completely free if you already have a bare patch and some spare bricks.
- Very fast to set up.
- Dirt naturally absorbs urine.
Cons:
- Can become very muddy during the rainy season.
- Muddy paws will track into your house.
- Requires occasional tilling to keep the dirt from compacting.
9. Indoor/Outdoor Plastic Grate Tray (Store Bought)
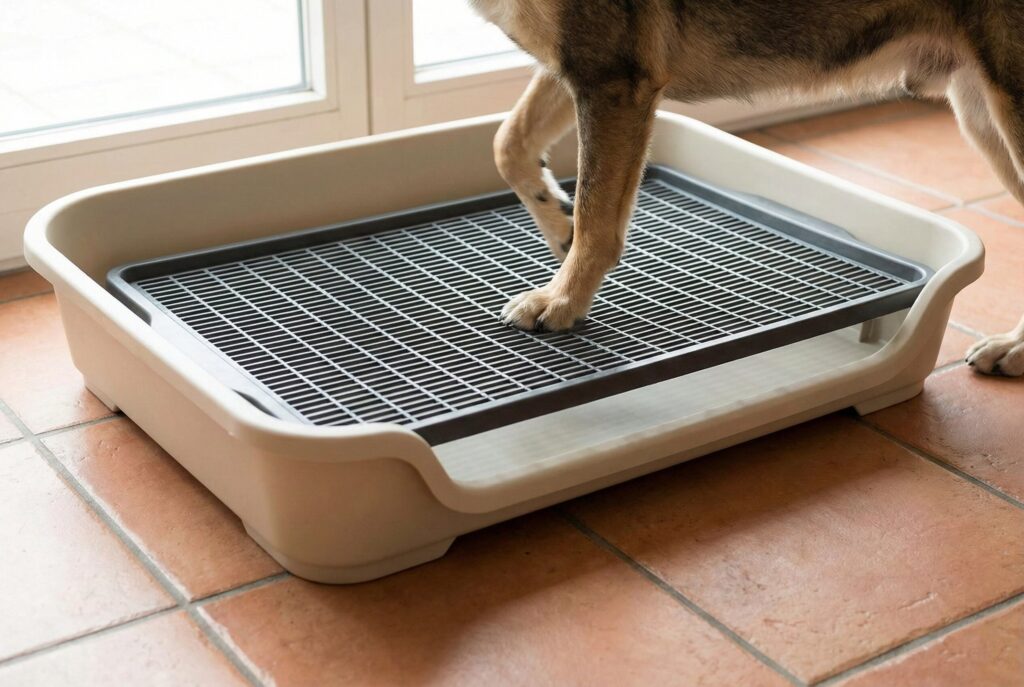
Plastic grate trays are highly practical, especially for smaller dogs. These store-bought systems consist of a collection pan and a snap-on plastic grid that sits about an inch above the pan.
When your dog pees, the liquid goes straight through the grate and into the pan, leaving the grate surface completely dry. This guarantees that your dog never steps in their own urine, eliminating wet paw prints on your floors. You can line the bottom pan with a disposable pee pad to make emptying and cleaning even easier.
Pros:
- Keeps paws 100% dry and clean.
- Lightweight and highly portable.
- Very affordable compared to turf systems.
Cons:
- Not ideal for dogs with sensitive paws who might dislike the feel of hard plastic grids.
- Solid waste can sometimes get squished into the grate, requiring scrubbing.
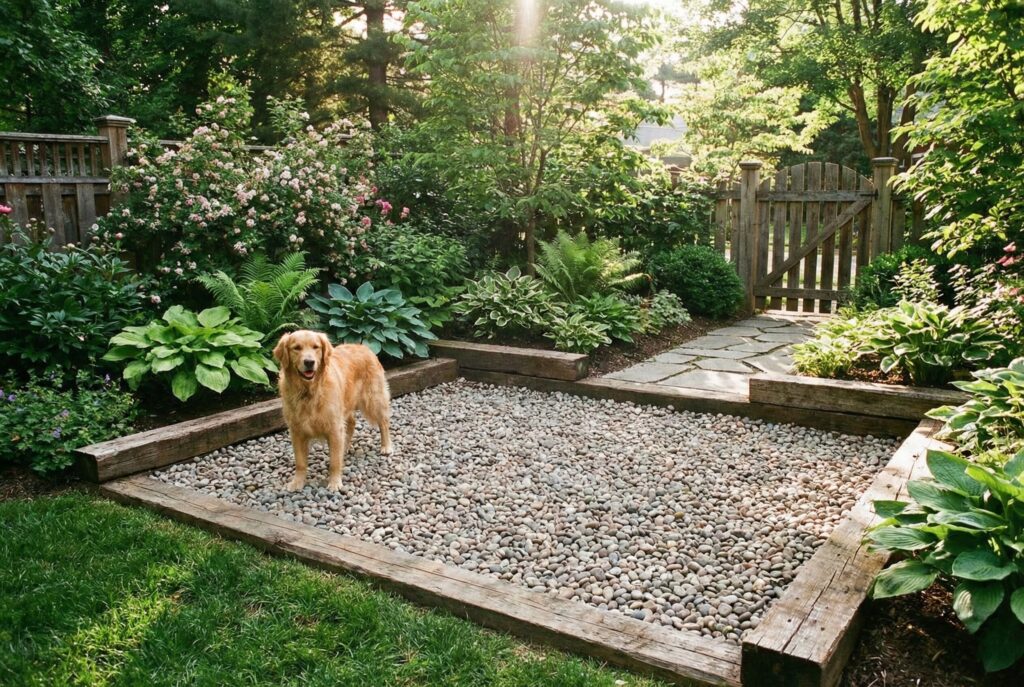
10. River Rock and Stepping Stone Path (DIY)
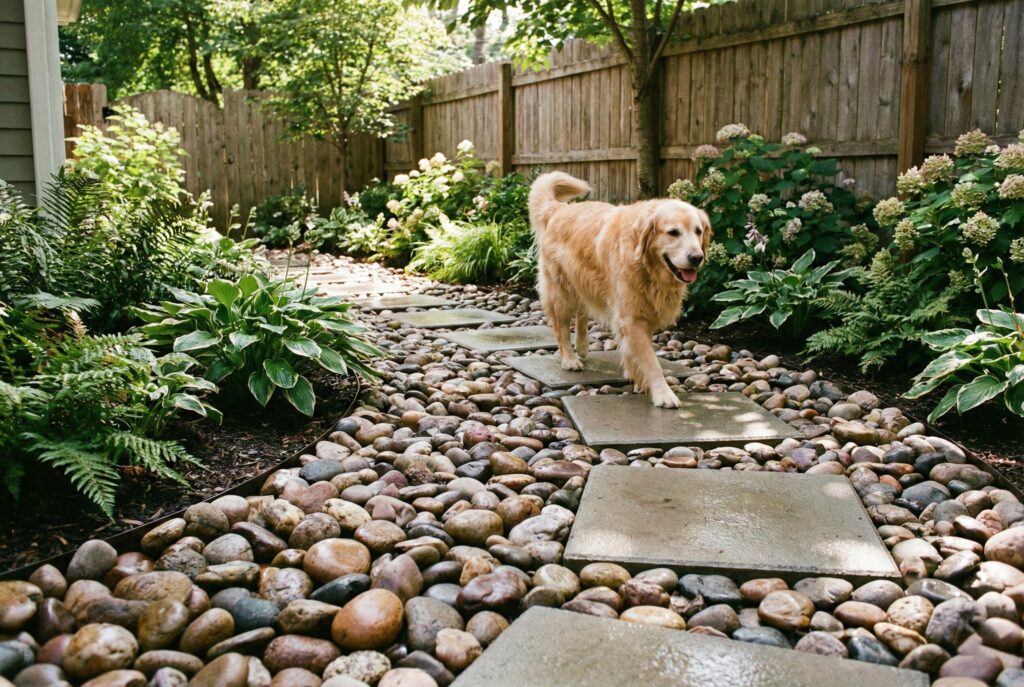
If you want your dog’s potty area to look like a high-end landscaping feature, consider a combination of river rocks and stepping stones. River rocks are larger than pea gravel (usually 1 to 3 inches in diameter). They are heavy enough that dogs cannot kick them out of the area, making them great for larger, active breeds.
By placing flat concrete stepping stones among the river rocks, you give your dog a comfortable, flat surface to stand on, while they can do their business on the surrounding rocks. The large gaps between river rocks provide the best drainage of any stone material.
Pros:
- Highly aesthetic; looks like a Zen garden.
- Rocks are too heavy to scatter.
- Exceptional drainage prevents any standing puddles.
Cons:
- Solid waste can be difficult to scoop if it falls deep between large rocks.
- River rocks are heavy and labor-intensive to haul and install.
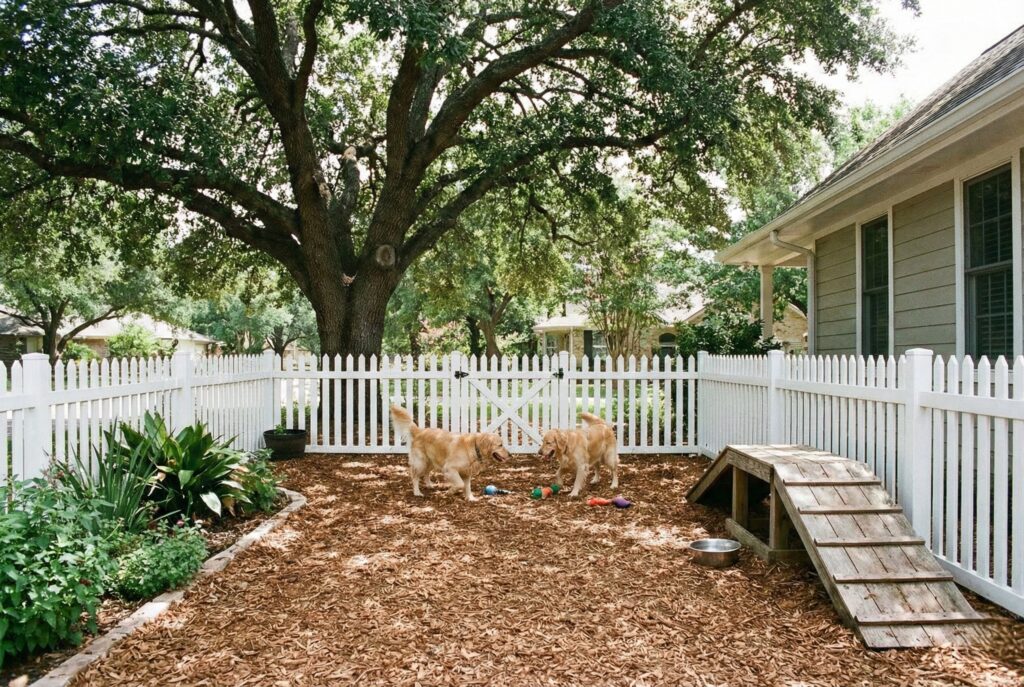
11. The Hidden Potty Behind Shrubs (DIY Landscaping)
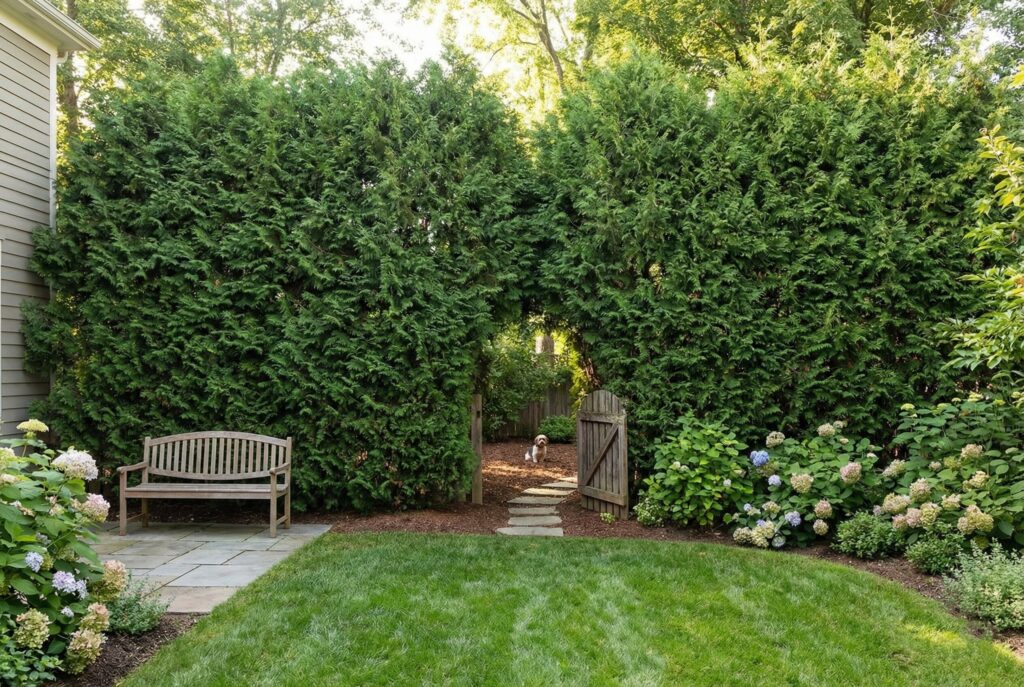
If you hate the look of a dog bathroom, hide it completely. You can dedicate a back corner of your yard to your dog and plant a living wall of pet-safe shrubs (like certain varieties of Viburnum or Camellias) to act as a visual screen.
Behind the shrubs lie your material of choice. mulch, gravel, or dirt. This requires no fencing or plastic borders. The shrubs act as a psychological barrier for the dog, and a visual barrier for you and your guests.
Pros:
- Completely hides the potty area from view.
- Integrates beautifully into your existing backyard landscaping.
- Shrubs provide natural shade for the dog.
Cons:
- Takes time for plants to grow tall enough to hide the area.
- You still have to walk behind the bushes to clean up the waste.
How to Train Your Dog to Use the Potty Area
Building the area is only half the battle. You now have to teach your dog that this specific spot is their new bathroom. Dogs are creatures of habit, so breaking their routine of going all over the yard takes patience and consistency.
Step 1: Use a Leash
For the first week or two, do not just let your dog out the back door. Put them on a leash. Walk them directly to the new potty area. Do not let them wander, sniff the rest of the yard, or play. This teaches them that the yard is no longer a free-for-all bathroom.
Step 2: Use a Command Word
While your dog is standing in the potty area, use a specific command like “Go potty,” “Do your business,” or “Hurry up.” Say it in an encouraging tone.
Step 3: Wait Them Out
Stand in the area and wait. This requires patience. If they do not go after five minutes, take them back inside and try again in an hour. Do not let them off the leash to run around the yard until they have successfully gone to the bathroom in the designated spot.
Step 4: Massive Rewards
The absolute second your dog finishes going to the bathroom in the correct area, reward them heavily. Give them a high-value treat (like a piece of chicken or cheese), offer verbal praise, and immediately unclip the leash so they can run and play in the rest of the yard. The yard becomes the reward for using the potty.
Step 5: Transfer the Scent
If your dog is confused about what the new area is for, pick up a piece of their solid waste from the yard and place it in the new potty area. You can also use a paper towel to wipe up some of their urine and bury the towel under the gravel or mulch. The scent will trigger their natural instinct to mark that spot.
Cleaning and Maintenance Tips
Even an outdoor potty area will start to smell terrible if you do not maintain it. Dog urine contains high levels of ammonia, and baking in the sun will quickly make your yard smell like a public restroom. Follow these maintenance rules to keep the space fresh.
Pick Up Solid Waste Daily
Do not wait for the weekend to scoop the poop. Pick up solid waste every single day. This prevents flies, stops bacteria from seeping into the ground, and keeps your dog from stepping in their own mess.
Hose It Down Weekly
Whether you use gravel, artificial turf, or concrete, you need to flush the urine away. Once a week, take your garden hose and thoroughly soak the entire potty area for a few minutes. This dilutes the urine and pushes it deep into the soil or drainage system, drastically reducing the ammonia smell.
Use Enzymatic Cleaners
Standard soap and water will not eliminate the smell of dog urine; it only masks it temporarily. You need to use an enzymatic cleaner designed specifically for yards and artificial turf. These cleaners contain live bacteria that literally eat the uric acid crystals left behind by dog pee. Simply attach a bottle of yard odor eliminator to your garden hose and spray the area down every two to four weeks.
Replace Natural Materials Annually
If you are using mulch, dirt, or sand, it will eventually become too saturated to clean effectively. Plan to rake out and completely replace the top layer of mulch or sand at least once a year, preferably in the early spring, to give your dog a fresh, clean start.
Conclusion
Creating a designated outdoor dog potty area is one of the best investments you can make for your backyard and your sanity. It protects your expensive lawn, centralizes the mess, and makes daily cleanup a breeze. Whether you opt for a budget-friendly DIY pea gravel pit, a natural cedar mulch corner, or a premium store-bought artificial turf system with built-in drainage, the key to success lies in proper setup and consistent training.
Take the time to evaluate your yard space, consider your dog’s size and habits, and choose the material that fits your lifestyle. With a little patience and a pocket full of treats, your dog will be using their new bathroom in no time, leaving you to finally enjoy a clean, green, and stink-free backyard.