Winter can be a brutal season for any animal spending time outdoors. While many of our feline friends are curled up on the sofa, there are countless others facing the elements. This includes community cats, strays and ferals navigating a daily battle against freezing winds and snow, as well as owned pets who may spend significant time outdoors or simply need a safe, warm retreat on the porch.
Providing a winter cat shelter is one of the most effective and compassionate ways to ensure these animals stay safe. Whether you are caring for a colony or looking to provide a “home away from home” for your own outdoor pet, a dry, insulated, and windproof space is essential. When temperatures drop below freezing, a well-built shelter can quite literally be a life-saver.
What This Guide Covers
This guide provides over ten actionable ideas to help you create a warm sanctuary for the cats in your life. We have categorized these solutions to fit every budget and skill level:
- Quick DIY Solutions: Five-minute setups using recycled household materials.
- Permanent Structures: Sturdy, long-term shelters you can build from scratch or purchase.
- The Golden Rules of Insulation: Essential tips on bedding and materials that apply to every type of shelter (and why some materials, like blankets, can actually be dangerous).
- Pet-Specific Upgrades: Features like heated pads or elevated entries for owned pets and wary ferals alike.
By the end of this article, you will have the tools and knowledge to transform a cold corner of your yard into a cozy, life-saving haven.

- Premium Size & Weatherproof Fir Wood Build: 29.6″L×29″W×50″H cat feeding station, crafted from 100% natural non-toxic fi…
- Dog-Proof Elevated Design: Optimized height makes this pet feeder dog-proof. Keeps food/water safe from animals when you…
- Spacious Multi-Functional Platform: 25.6″L×23″W large platform (70lbs capacity) works as food stand, shelter for feral c…

- [Dual-Layer Structure + 6 Flip Doors + Viewing Balcony] Featuring a dual-layer independent design, it creates ample vert…
- [Premium Resin Material, Sturdy & Ideal for Multi-Cat] Crafted from high-quality resin, specially designed to withstand …
- [All-Weather Protection, Stable Even in Storms] Built with all-weather protection, its sloped roof and elevated base div…

- ECOFLEX Construction – Made from recycled polymers and wood fiber blend for long‑lasting, moisture and odor‑resistant ou…
- Cozy Dual‑Door Entry – Included Vinyl flaps shield from wind and rain while allowing multiple cats easy access and escap…
- Elevated & Well‑Ventilated – Raised floor design promotes airflow; ideal base for an optional heated pad (sold separatel…
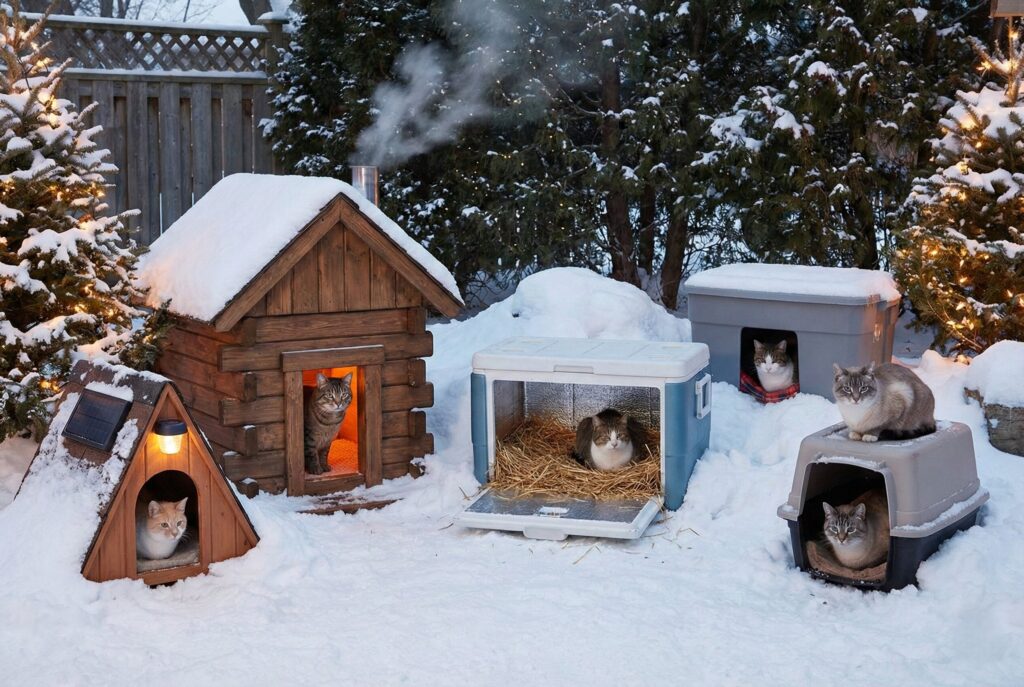
10+ Cozy Winter Cat Shelter Ideas (DIY + Store Bought)
Here are practical solutions ranging from quick DIY projects to durable purchased options.
1. The Double-Tub Rubbermaid Bunker
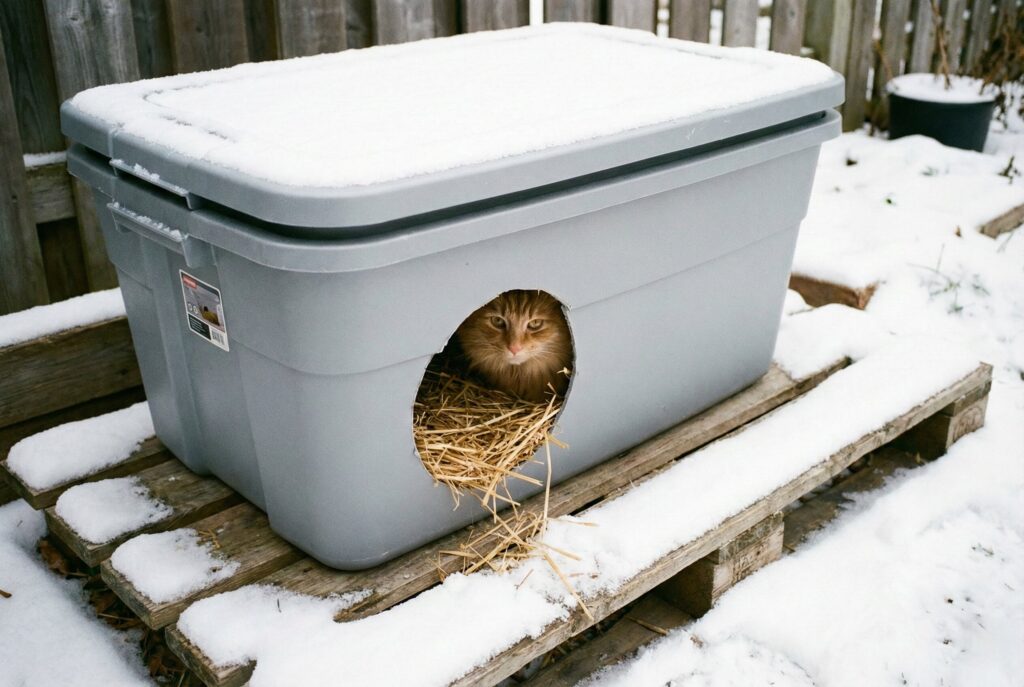
This is one of the most popular, durable, and effective DIY shelters you can make. It requires two plastic storage totes of different sizes that nest inside each other.
How it works: You place a smaller tote inside a larger one and fill the gap between them with insulation.
- Materials Needed: One large plastic storage tub (e.g., 30-gallon), one smaller tub that fits inside with a 2-3 inch gap all around, rigid foam insulation or straw, a utility knife, and duct tape.
- The Build: Cut a 6-inch entrance hole through both tubs in the same spot. Line the bottom of the big tub with insulation. Place the small tub inside. Stuff the gaps between the walls of the two tubs tightly with foam or straw. Put insulation on top of the small tub’s lid, then secure the large tub’s lid on top. Fill the inner tub with straw bedding.
2. The Quick Styrofoam Cooler
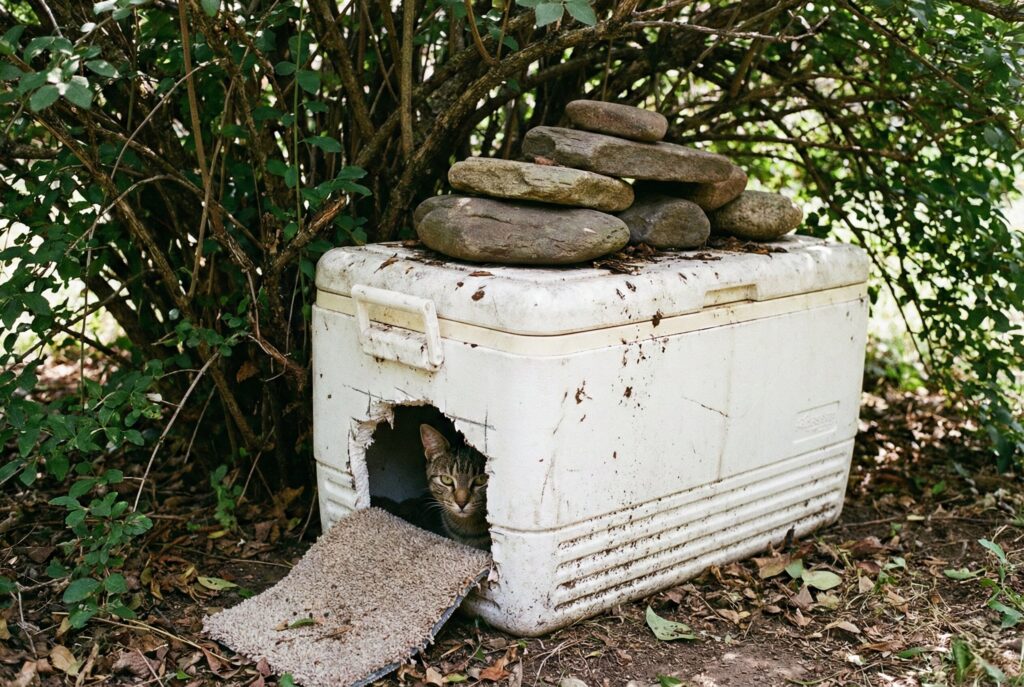
If you need an emergency shelter immediately, a thick Styrofoam cooler is an excellent insulator. These are often used for shipping medical supplies or perishable food.
How it works: The thick foam walls act as the structure and the insulation in one.
- Materials Needed: A large, thick-walled Styrofoam cooler (at least 1.5 inches thick), a utility knife, duct tape, and a straw.
- The Build: Tape the lid securely onto the top of the cooler. Use the utility knife to cut a 6-inch circular door near one of the bottom corners on a short side. Do not cut the hole too high, or heat will escape. Fill the cooler halfway with loosely packed straw. Place heavy rocks or bricks on top so they don’t blow away in strong winds.
3. The Upcycled Wooden Pallet House
For those with some carpentry skills, wooden pallets can be broken down to build a sturdy, permanent structure that looks nicer in a backyard.
How it works: Pallet wood is free and durable. You build a small box and line it with foam insulation.
- Materials Needed: Deconstructed wooden pallets, saw, nails/screws, rigid foam insulation boards, outdoor paint, and shingles (optional).
- The Build: Construct a simple cube structure with a slanted roof for rain runoff. Before sealing the final wall and roof, line the entire interior cavity with rigid foam insulation cut to size. Cut the entrance hole. Paint the exterior with weatherproof outdoor paint to protect the wood from rot.
4. The Insulated Deck Box Hideaway
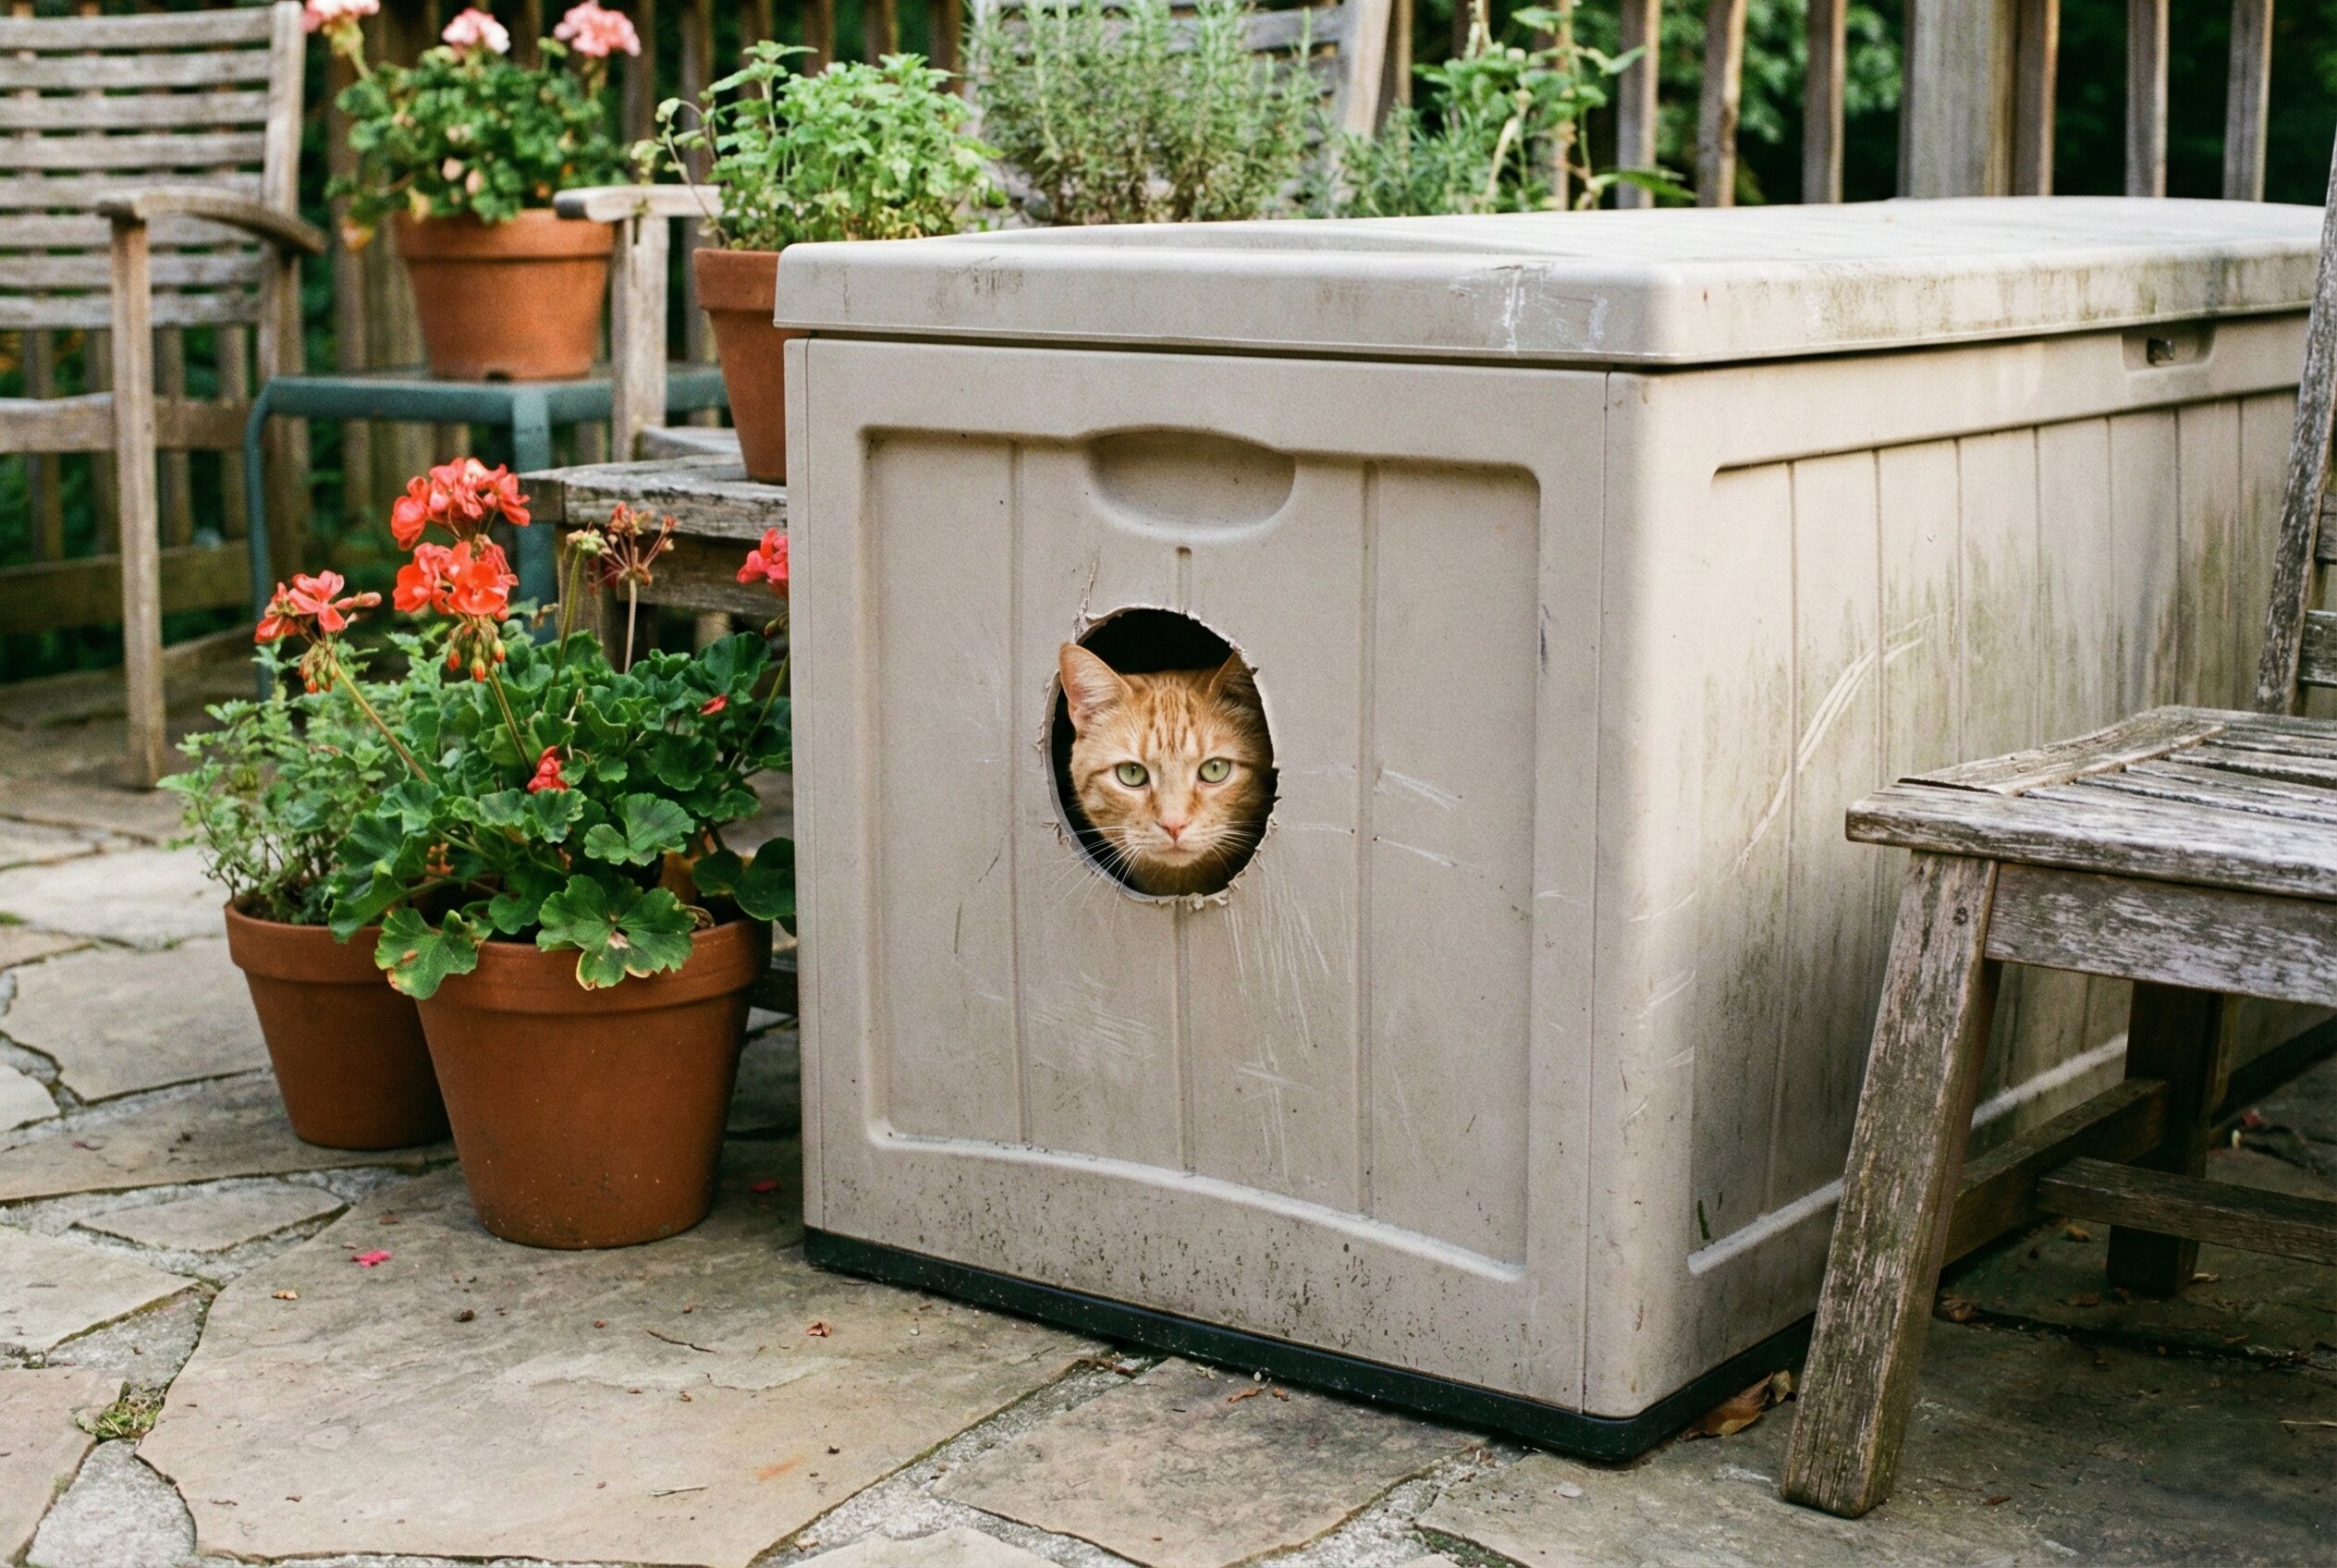

Many people have large plastic deck boxes for storing patio cushions. These can be easily converted into deluxe cat shelters.
How it works: The deck box provides a weatherproof shell. You just need to add the entrance and insulation.
- Materials Needed: A plastic deck storage box, a jigsaw or hole saw, rigid foam insulation, and straw.
- The Build: Cut an entrance hole in one of the side panels (not the top lid). Line the interior floor, walls, and underside of the lid with rigid foam insulation using adhesive. Fill the bottom with a generous amount of straw. Because deck boxes are large, you can sometimes fit two separate sleeping compartments inside using a divider.
5. The Retrofitted Dog Igloo
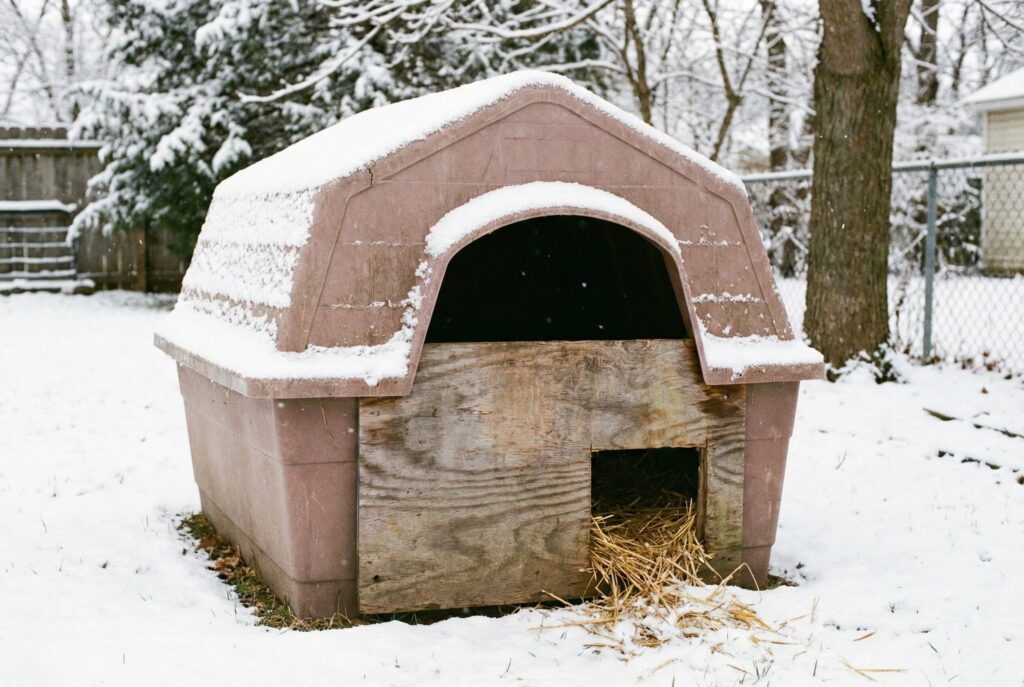
Plastic dog igloos are durable and wind-resistant due to their rounded shape, but they have poor insulation and openings that are too large for cats. They need heavy modification for winter use.
How it works: You must reduce the door size and add internal insulation.
- Materials Needed: A plastic dog igloo, duct tape, rigid foam, and straw.
- The Build: The most important step is covering most of the large entrance opening. Use duct tape and plastic sheeting or plywood to block 75% of the door, leaving only a small 6-inch gap at the bottom side for the cat to enter. Line the curved interior walls with reflective Mylar blankets glued to the plastic. Fill the bottom deeply with straw so the cat can burrow.
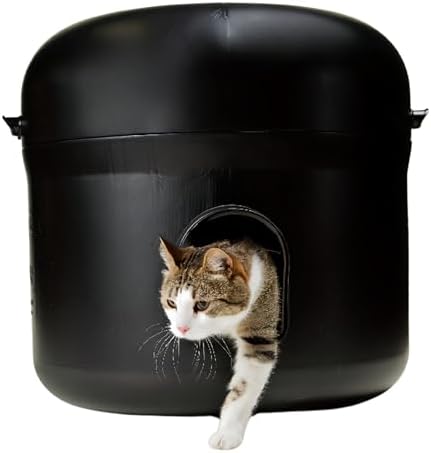
6. The Heated Thermo-Kitty Shelter (Store-Bought)
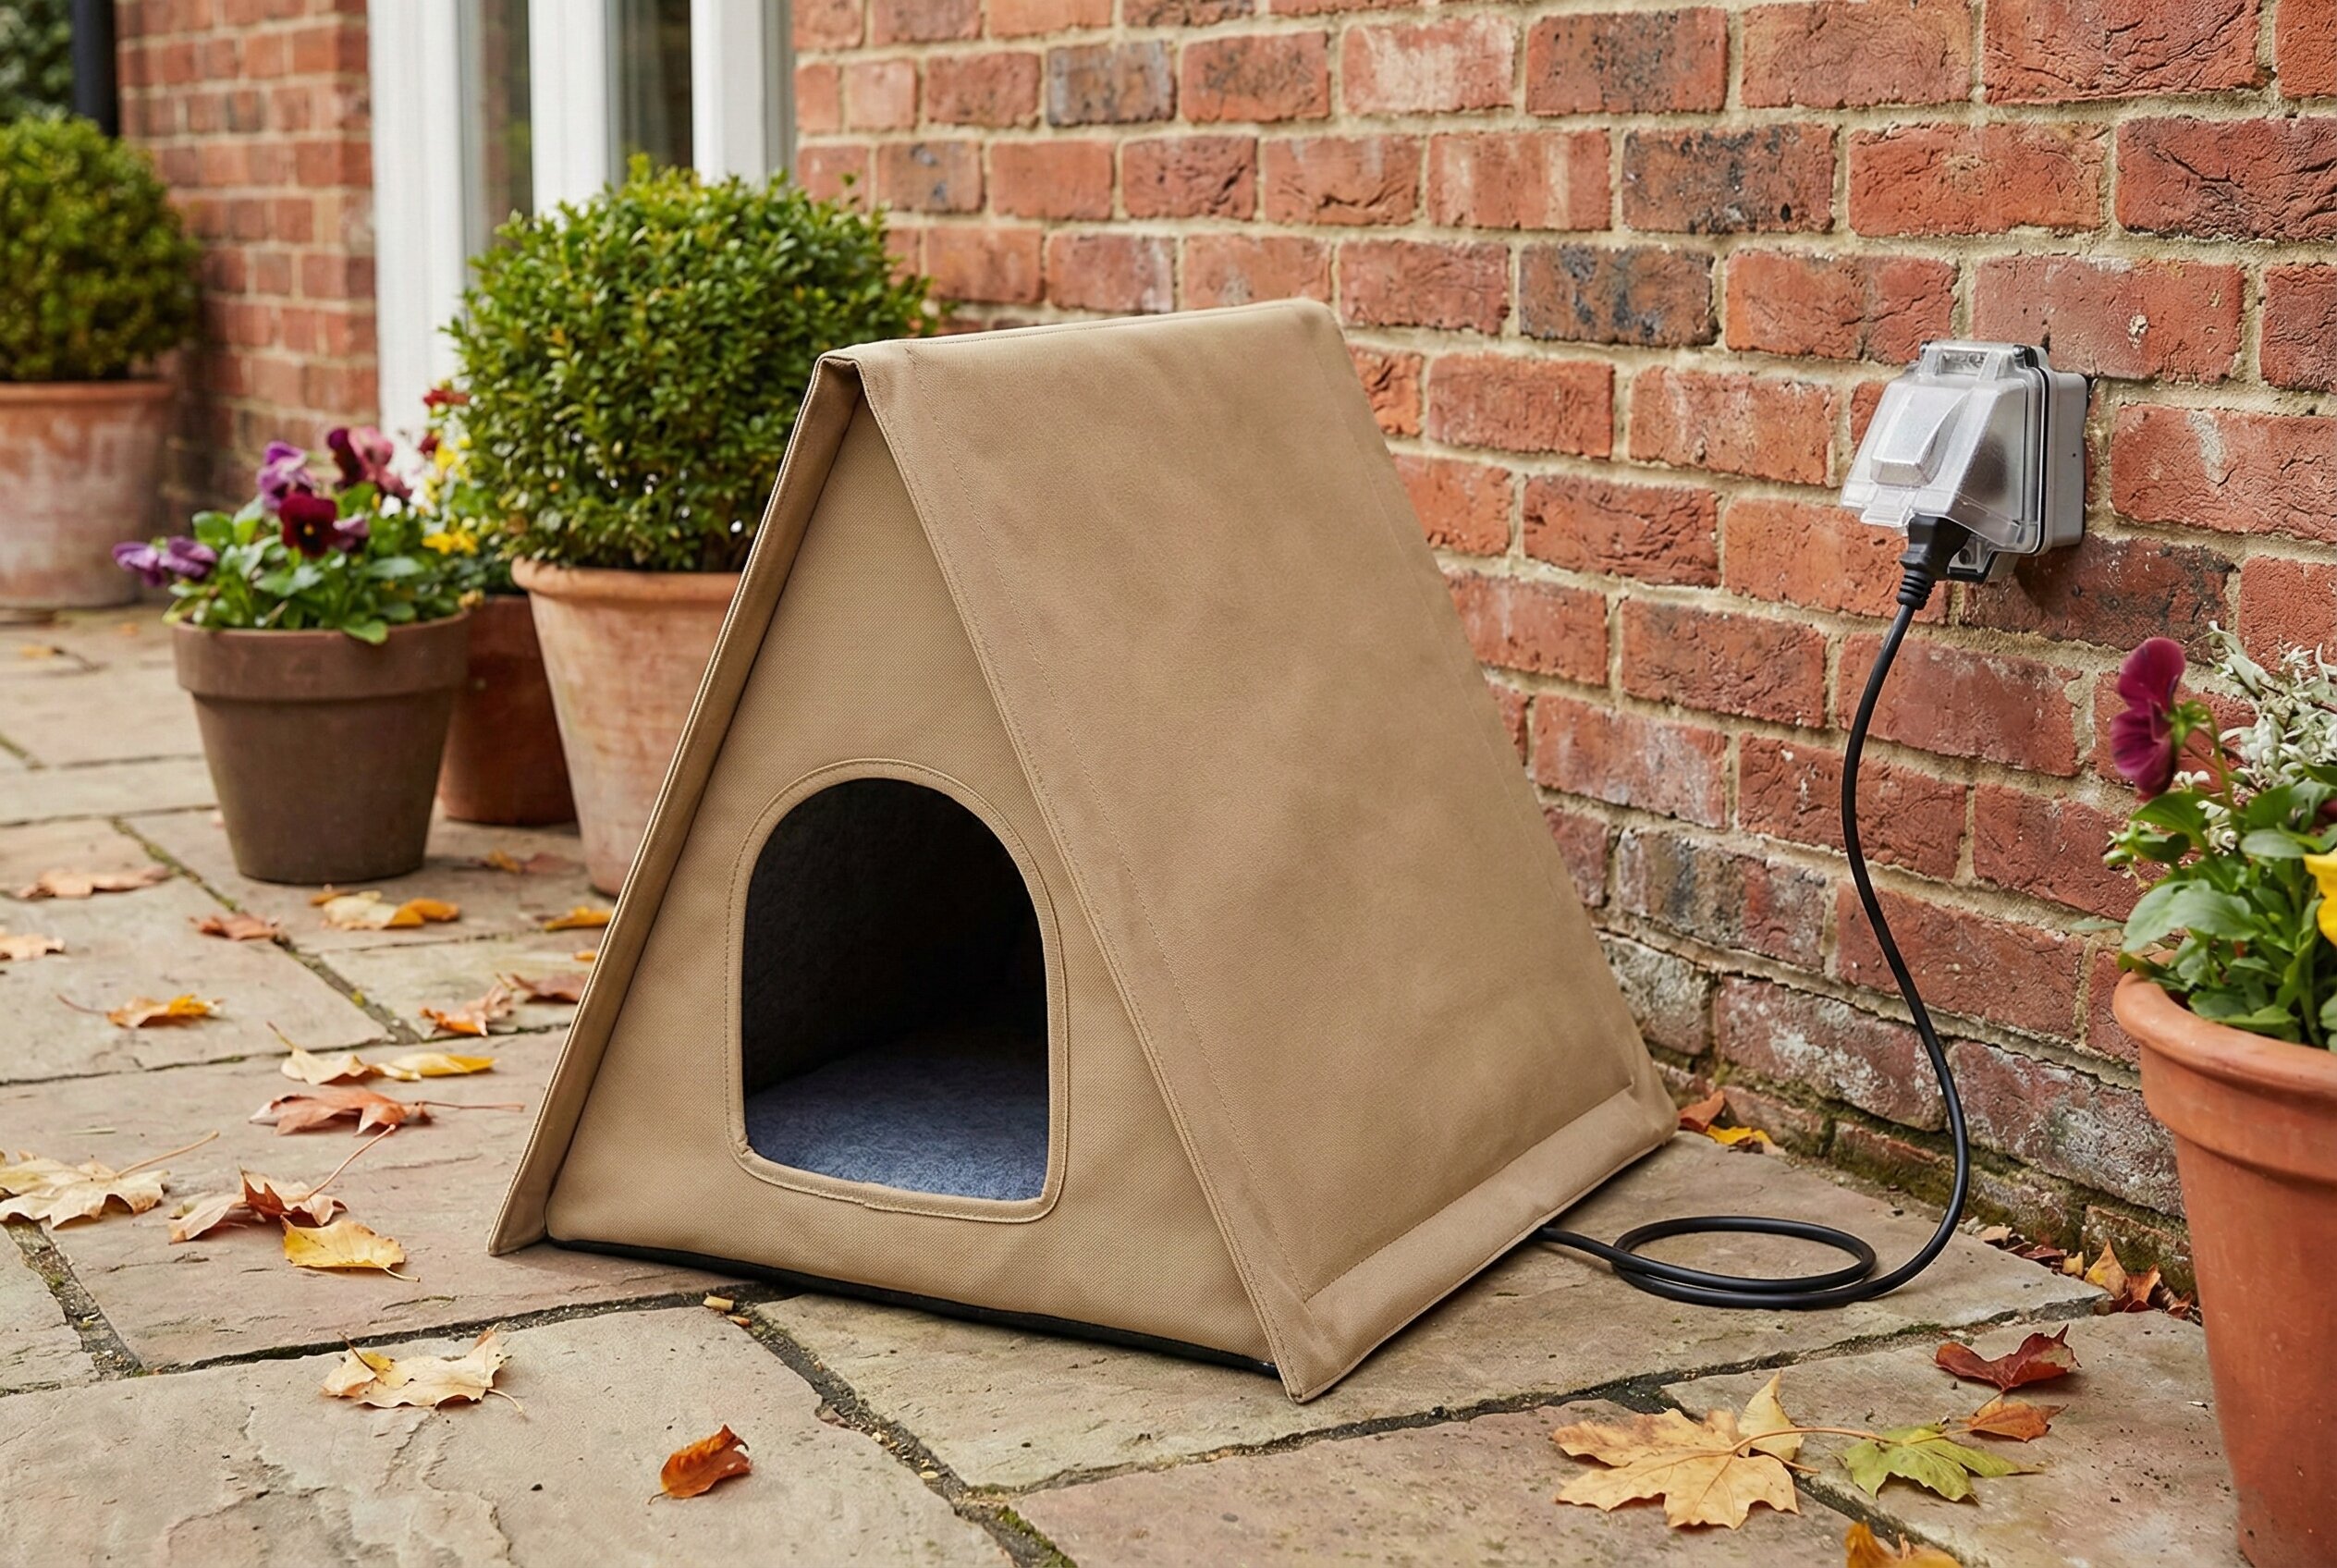

If you have access to an outdoor electrical outlet (GFCI-protected), a heated shelter is the ultimate luxury for a senior or sick feral cat.
How it works: These shelters come with a specialized outdoor heating pad that only warms up when the cat lies on it, usually maintaining a safe temperature of about 102°F (the cat’s body temperature).
- Details: Look for brands like K&H Pet Products. These shelters are usually made of heavy-duty nylon canvas with a rigid structure. They are easy to assemble via zippers or Velcro. Ensure the electrical cord is rated for outdoor use and protected from chewing rodents.
7. The Hard-Shell Insulated Cat House (Store-Bought)
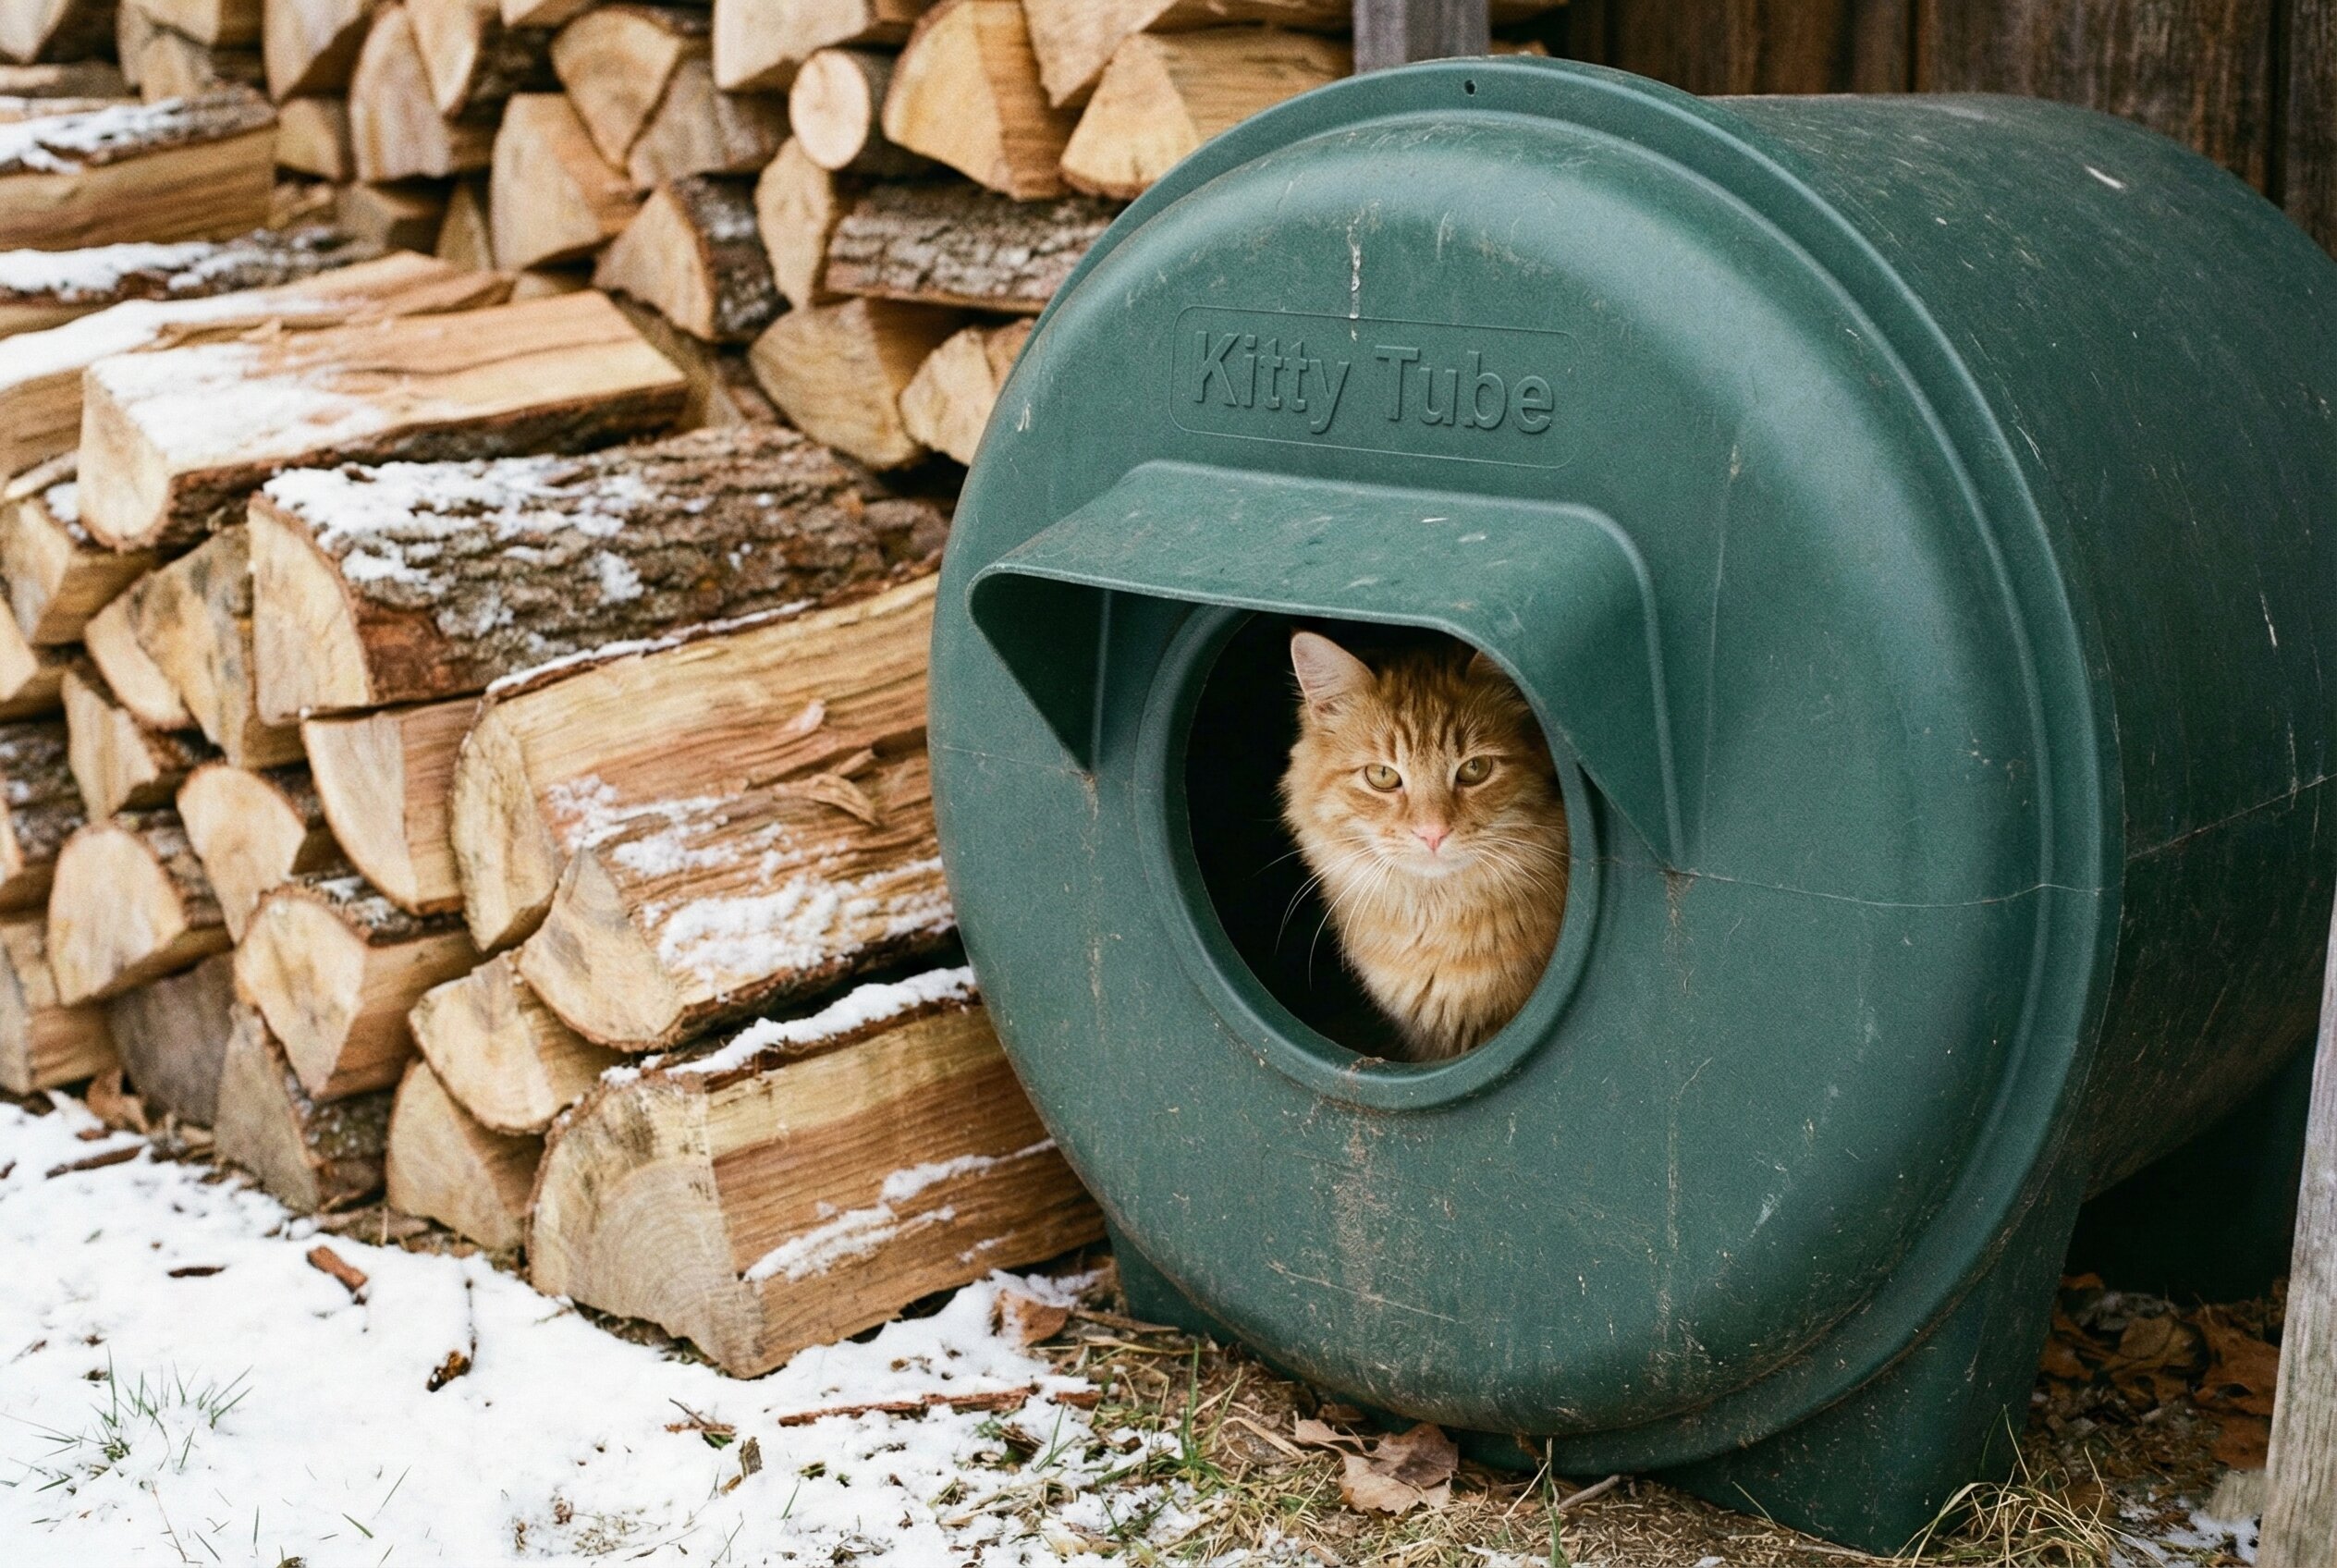
If you want a durable solution without the DIY effort and don’t have electricity, there are excellent pre-fabricated options.
How it works: These are similar to the double-tub DIY method but are manufactured professionally. They usually feature double-walled polyethylene construction with insulation sealed inside the walls.
- Details: Look for products like the “Kitty Tube.” These often have unique designs, such as top-lid access for easy cleaning and specialized awning entryways that prevent rain and snow from blowing directly into the sleeping area. They are virtually indestructible.
8. The Cardboard Box Emergency Liner
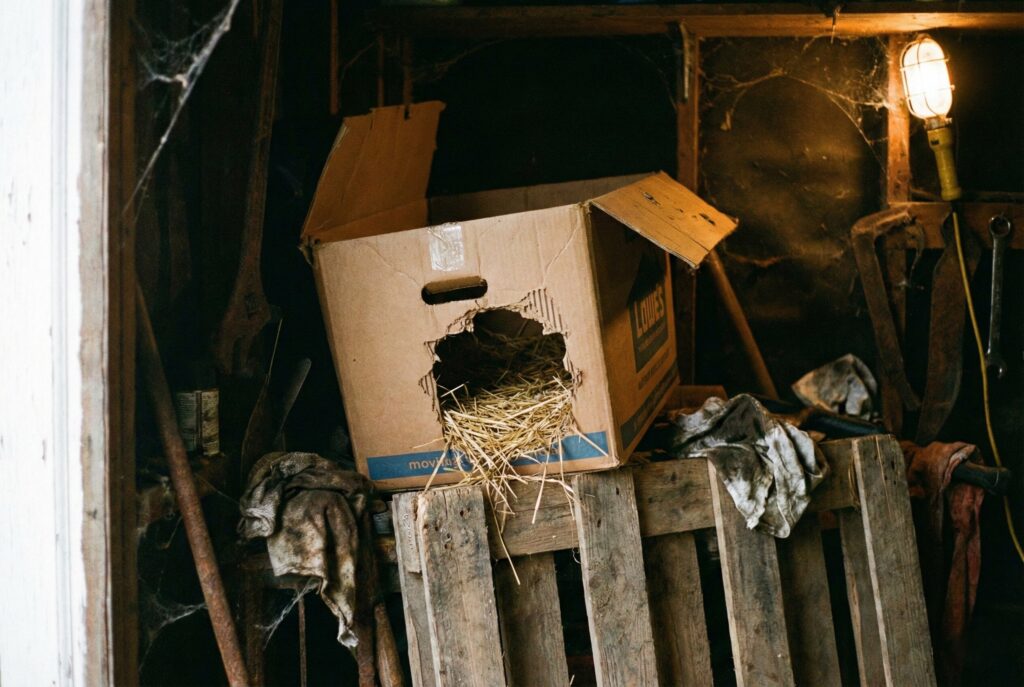
While cardboard cannot survive outdoor weather on its own, thick cardboard boxes make excellent liners for other structures during a sudden cold snap.
How it works: If you have a shed, garage, or a large wooden crate that blocks the wind but is cold inside, place a smaller cardboard box inside it.
- The Build: Tape a thick cardboard box shut. Cut a small hole in it. Fill it partially with straw. Place this box inside a larger, weatherproof area like under a porch or inside a drafty barn. The cardboard traps the cat’s heat in a smaller zone, and the outer structure keeps the cardboard dry.
9. Under-Deck Fortification
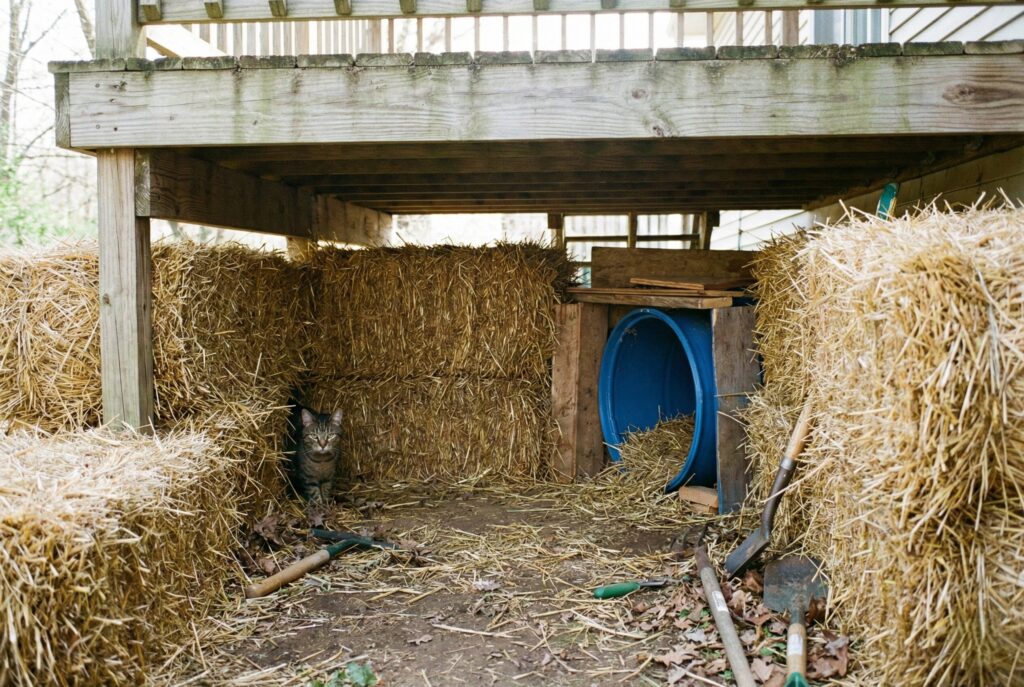
If you have an elevated deck, cats are likely already trying to hide underneath it. You can turn this space into a safer shelter.
How it works: Use the existing deck structure and make it windproof.
- The Build: Identify the corner under the deck that is most protected from the wind. Use plywood sheets, heavy-duty tarps, or bales of straw to create walls around this corner, blocking drafts. Inside this protected nook, place a simple plastic tub shelter or a thick bed of straw raised off the ground on a pallet.
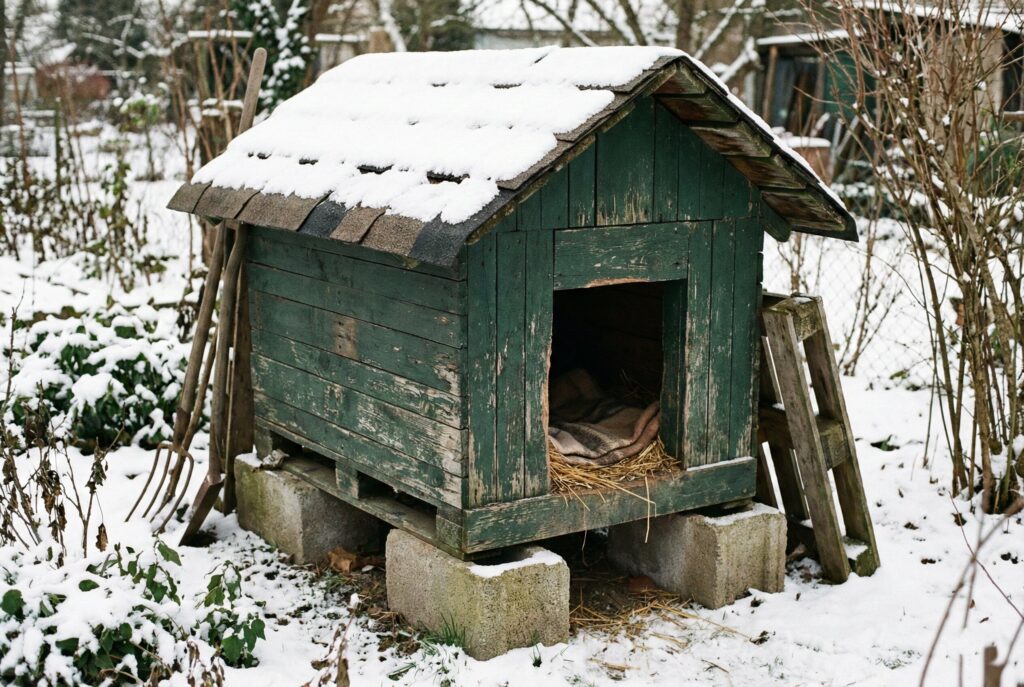
10. The Plywood Lean-To
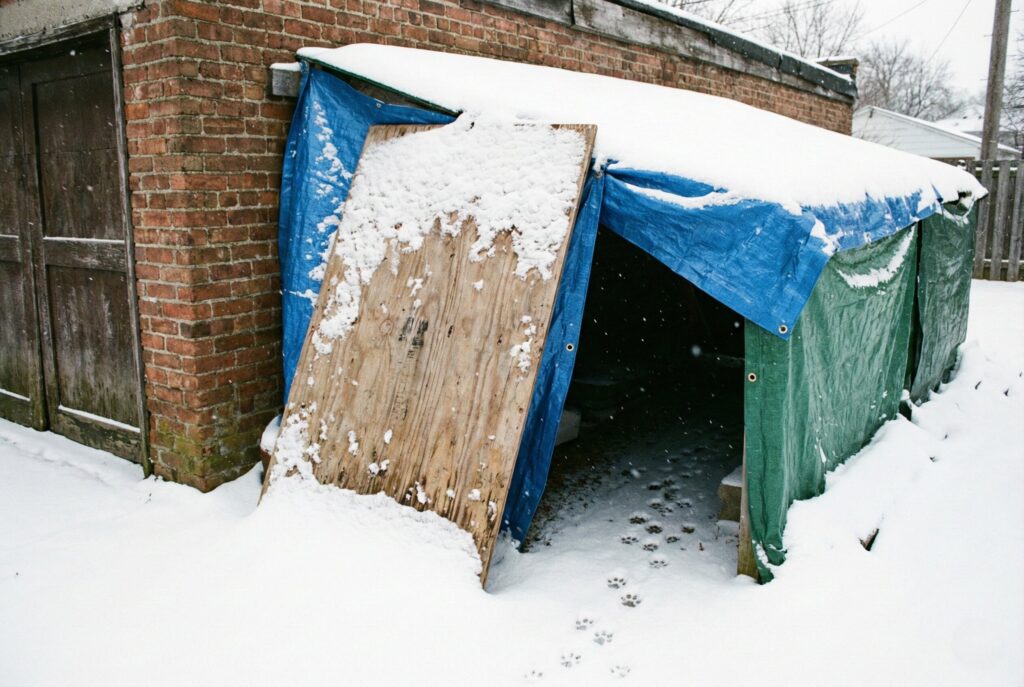
A lean-to is one of the simplest structures to build against an existing building like a house or garage.
How it works: It uses an existing exterior wall as the back of the shelter, saving materials and benefiting from slight heat leaking from the building.
- The Build: Take a large sheet of exterior-grade plywood. Lean it against the wall of your house at a 45-degree angle. Secure the top to the wall and the bottom to the ground so it doesn’t slide. Close off the triangular sides with more plywood scraps or heavy plastic sheeting. Fill the protected triangle space underneath with a deep pile of straw.
11. Bonus Idea: The Solar Pool Cover Wrap
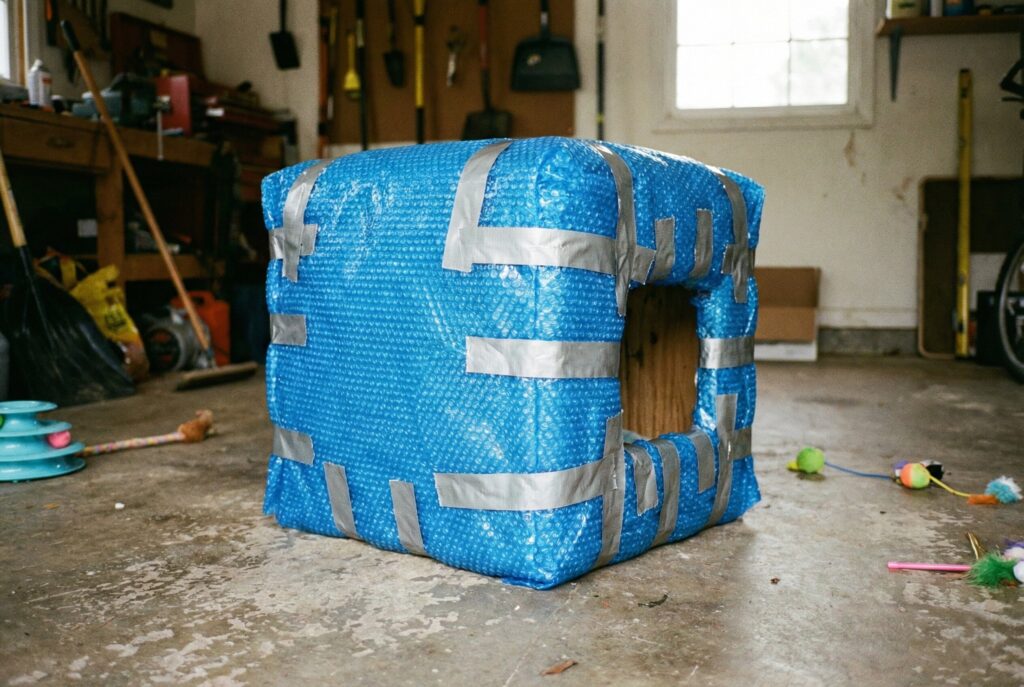
This is a hack to add super-insulation to any existing shelter that isn’t warm enough.
How it works: Solar pool covers look like heavy-duty blue bubble wrap. They are designed to trap intense heat.
- The Technique: If you have a basic wooden box or a plastic shelter that feels thin, wrap the entire exterior (except the door and bottom) with a layer or two of solar pool cover material. Secure it with heavy-duty all-weather tape. This adds incredible heat retention properties to a mediocre shelter.
The Golden Rules of Winter Cat Shelters
Before looking at specific designs, it is crucial to understand what makes a shelter safe and effective. A shelter that is too big, poorly insulated, or filled with the wrong bedding can sometimes be worse than no shelter at all.
Size Matters: Small is Better
A common mistake is building a shelter that is too large. Cats rely on their own body heat to warm the interior space. If the shelter is too cavernous, their body heat will dissipate, and they will remain cold.
The ideal size for a one-cat shelter is roughly 18 inches high, 18 inches wide, and about 24 inches long. It should be just big enough for the cat to stand up, turn around, and curl up snugly.
Insulation is Essential
The outer shell of a shelter breaks the wind, but insulation is what traps heat. Thin plastic or wood walls offer very little thermal protection on their own. You must line the walls, floor, and ceiling of any DIY shelter with insulating material.
Good insulation options include:
- Rigid foam insulation boards (often pink or blue, found at hardware stores)
- Styrofoam sheets
- Mylar reflective blankets (used as a liner to reflect body heat back)
Bedding: Straw, Never Hay
This is the most critical rule of cat shelters. The bedding you choose determines if the cat stays dry or freezes.
Use Straw: Straw is the dry, hollow stalks of harvested grain. Because the stalks are hollow, they trap air and hold heat. Straw also does not absorb moisture readily, allowing cats to burrow into it and stay dry.
Do Not Use Hay: Hay is dried grass meant for feeding livestock. It soaks up moisture like a sponge. If a wet cat enters hay bedding, the hay will get damp and eventually freeze solid, making the cat colder.
Do Not Use Blankets or Towels: Fabrics like cotton or fleece absorb moisture from the air and from the cat’s fur. In freezing conditions, these fabrics will freeze stiff, drawing heat away from the cat’s body.
Location and Placement
Where you put the shelter is just as important as how you build it.
- Off the Ground: Place the shelter on bricks, a wooden pallet, or cinder blocks. This prevents cold from seeping up through the ground and keeps rain or melting snow from flooding the floor.
- Wind Break: Face the entrance away from prevailing winds. Placing the shelter near a wall, under a deck, or behind bushes provides extra protection.
- Small Entrance: The door should only be about 6 inches in diameter, just big enough for a cat to squeeze through. A small door keeps out drafts and larger predators like coyotes. Place the door opening several inches above the floor of the shelter to prevent snow from blowing in and to keep kittens inside.
Maintaining Your Winter Shelter
Building the shelter is only step one. To ensure it actually protects the cats, you must maintain it throughout the winter.
Check Bedding Weekly
You must check the straw regularly. If rain or snow has blown in, the straw will get wet and moldy. Wet straw cannot keep a cat warm. Remove any damp straw immediately and replace it with fresh, dry straw.
Ensure Access
After a heavy snowfall, go outside and shovel a clear path to the shelter entrance. If the snow is deep, the cat may be trapped inside or unable to reach the shelter from the outside. Make sure the small entrance hole has not been blocked by drifting snow.
Entrance Flaps
If you find that wind is blowing too much snow into the shelter, consider adding a heavy vinyl flap over the doorway. Clear vinyl carpet runners work well. Tack it above the door inside the shelter so the cat can push through it. Note that some feral cats are afraid of flaps and won’t use them, so monitor if they are still entering the shelter after installing one.
Other Ways to Help Winter Cats
Providing shelter is crucial, but calories are needed to generate body heat.
Provide Extra Food
Cats burn significantly more calories in winter just trying to stay warm. Increase the amount of dry food you provide. Feed them on a regular schedule so they know when to come, and try to feed them during the warmest part of the day.
Water is Critical
Cats can die of dehydration in winter because all available water sources are frozen. You must ensure they have access to liquid water.
- Use a heated electric water bowl if you have an outlet.
- If you don’t have electricity, use thick, dark plastic bowls (they absorb sunlight) and change the water twice a day.
- There are microwavable discs available that you can place under a water bowl to keep it unfrozen for several hours.
By taking the time to construct one of these cozy shelters, you are providing a vital lifeline for community cats. It is a small effort that makes a world of difference to felines struggling to survive the harsh winter elements.